
Recommended Cleaning Supplies & Bench Setup
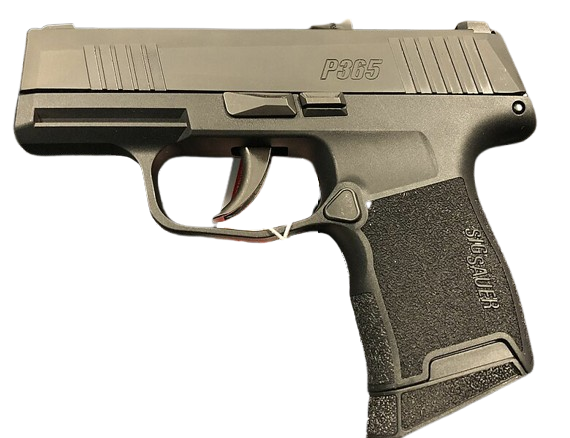
The SIG Sauer P365 and P365X field strip with zero tools and do not require pulling the trigger during disassembly. Because everyday carry micro-compacts collect pocket lint alongside carbon fouling, periodic cleaning keeps FCU cycling crisp:
| Supply Item | Purpose on the SIG Sauer P365 / P365X | Where to View |
|---|---|---|
| 9mm Bore Brush, Patches & Cleaning Rod / Bore Snake | Clears copper and carbon fouling inside the 3.1" carbon-steel barrel | Gear Storefront → |
| Firearm Cleaning Solvent / CLP | Breaks down powder residue on the feed ramp, breech face, and extractor | Gear Storefront → |
| Nylon Utility Brush, Swabs & Lint-Free Cloths | Removes carry lint from the grip module, FCU rails, and optic-ready slide cut | Gear Storefront → |
| Synthetic Gun Oil | Provides a thin lubricating film on the 4 FCU rail tabs, sear contact, and barrel hood | Gear Storefront → |
Part 1: Unloading & Safety Verification
Always treat the firearm as loaded until you have personally confirmed that both the magazine well and chamber are empty:
- Point in a Safe Direction: Keep the muzzle pointed in a safe direction and keep your finger completely off the trigger and outside the trigger guard.
- Remove the Magazine: Press the magazine release button and pull the 10-round or 12-round magazine completely out of the grip module.
- Lock the Slide to the Rear: Grasp the rear slide serrations firmly, pull the slide fully to the rear, and push the slide catch lever upward into the slide notch.
- Visually and Physically Inspect: Look into the ejection port and magazine well, and insert a finger into the chamber area to confirm no cartridge is present.
Part 2: Field Stripping the SIG Sauer P365 / P365X
The P365 Fire Control Unit (FCU) uses a 90-degree rotating takedown lever that lowers the sear automatically—so you do not pull the trigger to remove the slide:
- Rotate the Takedown Lever Clockwise (90°): With the slide locked to the rear and no magazine inserted, rotate the left-side takedown lever clockwise until it points straight down in the vertical 6 o'clock position.
- Ease the Slide Forward Off the FCU: Hold the slide firmly, pull back slightly to release the slide catch lever, and guide the slide assembly smoothly forward off the Fire Control Unit rails.
- Remove the Recoil Spring Assembly: Turn the slide upside down, push the captured recoil spring assembly slightly forward toward the muzzle to unseat it from the barrel lug, and lift it out. Note: Keep the recoil spring orientation noted (flat/shaped rear base seats against the barrel lug).
- Lift Out the 3.1" Barrel: Grasp the barrel lug, lift the rear of the barrel upward, and slide it out through the bottom of the slide.
Part 3: Cleaning & Lubrication
Clean fouling and carry lint from each assembly, wipe dry, and apply a minimal film of oil so concealed carry lint does not stick:
- 3.1" Barrel Bore & Feed Ramp: Clean from chamber to muzzle without reversing a bore brush mid-stroke, scrub the feed ramp and locking lugs, and wipe completely dry.
- Slide, Breech Face & Extractor: Keep the muzzle angled downward while cleaning the breech face, extractor claw, and interior slide channels so solvent does not enter the striker channel; wipe dry.
- Recoil Spring & FCU Rails: Brush carry lint and carbon off the FCU rails, ejector, and grip module; apply 1 small drop of oil to each of the 4 FCU rail tabs, 1 small drop at the sear/trigger bar contact, and a thin sheen of oil on the barrel hood and exterior.
- Keep Striker & Bore Dry: Keep the striker channel, firing pin hole, and bore dry after cleaning.
Part 4: Reassembly & Function Check
- Reinstall the 3.1" Barrel & Recoil Assembly: Drop the barrel into the inverted slide, then seat the captured recoil spring assembly into the front slide hole with the shaped rear base aligned vertically against the lower barrel lug step so it will not bind during slide installation.
- Fit the Slide onto the FCU Frame: Align the slide channels with the FCU rails and draw the slide all the way to the rear, pushing the slide catch lever upward to hold it open.
- Return the Takedown Lever: Rotate the takedown lever counter-clockwise back to its horizontal 9 o'clock position, then release the slide forward.
- Perform a Dry Function Check (Confirm Unloaded First): Rack the slide 2–3 times to verify smooth cycling, check trigger press and tactile reset, and confirm the slide locks open on an empty magazine.
Best Maintenance Habits
- Brush pocket lint out of a daily-carry P365 / P365X every 1–2 weeks
- Keep the striker channel, breech face, and bore dry after cleaning
- Orient the recoil spring base vertically against the barrel lug before slide install
- Complete a dry trigger, reset, and empty-magazine slide-lock check
Common Mistakes to Avoid
- Inserting a magazine while the takedown lever is rotated to 6 o'clock
- Installing the recoil spring upside down/sideways, causing slide binding
- Over-oiling FCU surfaces so pocket lint turns into gummy buildup
- Spraying cleaner or oil directly into the striker channel