
Why Your Optic Keeps Coming Loose on a Springfield Echelon (And How to Fix It Permanently)
If your red dot sight wobbles side-to-side, loses zero, or backs its screws out after a single range trip on your Springfield Echelon 9mm, the culprit is almost never a defective slide cut. Because the Echelon's Variable Interface System (VIS) relies on self-locking directional pins and strict screw-protrusion tolerances, a small setup oversight will let slide recoil hammer the fasteners loose. Here is how to diagnose the exact failure and lock your optic down for good.
Quick Diagnostic: Match Your Symptom to the Cause
| What You Are Seeing | Most Likely Root Cause | Permanent Fix |
|---|---|---|
| Optic wobbles even when screws feel tight | Screws are bottoming out in the slide (protruding > 0.110" / 2.8mm) or hitting the right-side extractor channel | Switch to shorter Echelon VIS screws and verify ≤ 0.110" protrusion beneath the optic base |
| Optic has side-to-side play before torquing | Wrong VIS pin set installed, left/right delta pins swapped, or pins not seated flat in slide pockets | Install the matching VIS pin set with "L" on the left and "R" on the right (muzzle pointed away) |
| Screws back out after 50–150 rounds | Oil in slide threads, standard Loctite 242 used on unprimed stainless steel, or < 24-hour cure time | Degrease threads thoroughly, apply oil-tolerant Loctite 243, torque to spec, and cure 24 hours |
| Right screw loosens faster than left screw | Right mounting screw is slightly too long and contacts the extractor spring assembly | Shorten or replace the right-side screw so it clears the extractor channel completely |
6 Reasons an Optic Loosens or Wobbles on the Springfield Echelon
1. Mounting Screws Protrude More Than 0.110" (2.8mm)
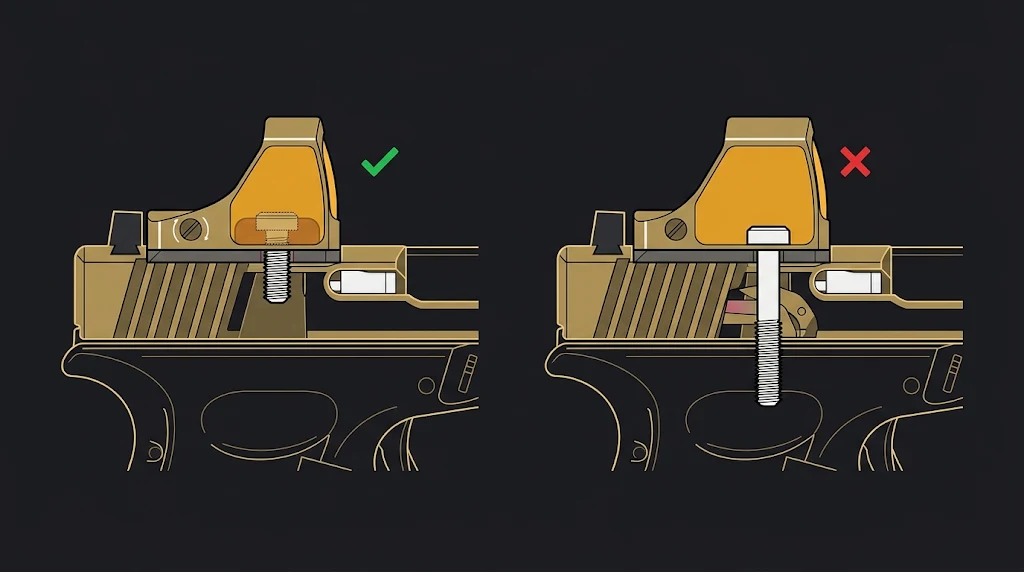
According to the Springfield Armory Echelon manual, mounting screws must not protrude more than 0.110 inches (2.8mm) past the bottom surface of the optic housing. Many red dots ship with generic screws meant for thick adapter plates. When used directly on the Echelon slide, overly long screws bottom out in the threaded holes before the screw head clamps the optic down—leaving the sight loose even when your driver clicks at full torque. Worse, the right-side screw hole sits directly above the extractor channel; a screw that extends past 2.8mm will rub the extractor spring, causing recoil vibrations to walk that screw straight out.
2. VIS Pins Are Missing, Swapped Left/Right, or Seated Incorrectly
The Echelon's patent-pending Variable Interface System uses self-locking pins that expand laterally against the optic's recoil lug pockets as you tighten the screws. If you mount an optic without pins, or swap the handed "L" (Left) and "R" (Right) delta-shaped pins, the pins cannot wedge properly against the optic housing. Without pin engagement, the two small mounting screws absorb 100% of the slide's violent forward-and-rearward acceleration and quickly shear or back out.
3. Factory Preservative Oil or Solvent in the Threads
Springfield slides ship coated in rust-preventative oil that pools inside the blind optic screw holes. Standard blue threadlocker (such as Loctite 242) cannot cure properly through oil or on passive stainless steel hardware without a chemical activator—leaving a slick, rubbery residue that lets screws vibrate loose under 9mm +P or target loads.
4. Tightening by "Feel" Instead of Using an Inch-Pound Torque Driver
Wrist-tightening small optic fasteners with an L-shaped Allen or Torx key leads to inconsistent clamp force. Under-torquing leaves slack under recoil, while over-torquing stretches the screw shank or strips the slide threads. Springfield Armory specifies do not exceed 18 in-lbs for VIS adapter plates, and most direct-mount red dot manufacturers specify 15 in-lbs.
5. Firing the Pistol Before the Threadlocker Fully Cures
Anaerobic threadlockers cure only in the absence of air between clean metal threads. While fixture time begins in 10–20 minutes, full breakaway strength takes 24 hours. Taking the pistol to the range an hour after installation breaks the microscopic polymer bonds before they harden.
6. Thread Pitch Mismatch (6-32 vs. M4x0.7)
The Echelon slide uses two different thread standards depending on the optic footprint: Trijicon RMR-footprint sights use 6-32 screws, whereas Leupold DeltaPoint Pro and Shield RMSc / Holosun K-footprint sights use M4x0.7 screws. Forcing an M4 screw into a 6-32 hole (or vice versa) damages the slide threads and prevents the fastener from holding torque.
Tools & Replacement Parts Required
Before re-mounting your optic, gather the proper tools and OEM-spec fasteners so you only have to do this once:
- Calibrated Inch-Pound Torque Driver: Wheeler F.A.T. Wrench (10–65 in-lbs) or Fix It Sticks Optic Mounting Torque Drivers so you hit exact inch-pound specs without stripping Torx heads.
- Oil-Tolerant, Primerless Blue Threadlocker: Loctite 243 Medium-Strength Threadlocker (formulated specifically for stainless steel and passive metals without needing a separate primer).
- Fast-Evaporating Firearm Degreaser: Birchwood Casey Gun Scrubber Firearm Cleaner (or 91%+ isopropyl alcohol) paired with lint-free cotton swabs to strip oil out of blind screw holes.
- Correct Echelon VIS Mounting Screws (If Yours Are Too Long or Stripped): Springfield Armory Echelon Optic Mounting Screw Kit (SKU: EC5077S-KIT), which includes factory-length screws matched to popular optics without grinding.
- OEM Echelon VIS Pins (If Lost or Damaged): Springfield Armory Echelon Pin Set (SKU: EC5076) or the Complete Echelon VIS Pin Set (EC5076-SET) at Midwest Gun Works.
Step-by-Step Guide: How to Fix a Loose Optic on Your Springfield Echelon
Step 1: Unload and Field Strip the Slide
Remove the magazine, lock the slide back, and visually and physically inspect the chamber to confirm the pistol is completely unloaded. Field strip the slide from the grip module and remove the recoil spring assembly and barrel so you can work on a flat, stable surface without getting solvent inside the frame.
Step 2: Remove the Optic, Old Screws, and VIS Pins
Unscrew the existing fasteners and lift the optic off the slide. Remove the VIS pins from the slide pocket and set them aside. Inspect the screw threads and slide holes under bright light for stretched threads, metal shavings, or gummy, uncured threadlocker.
Step 3: Degrease the Slide Cut, Screw Holes, and Fasteners
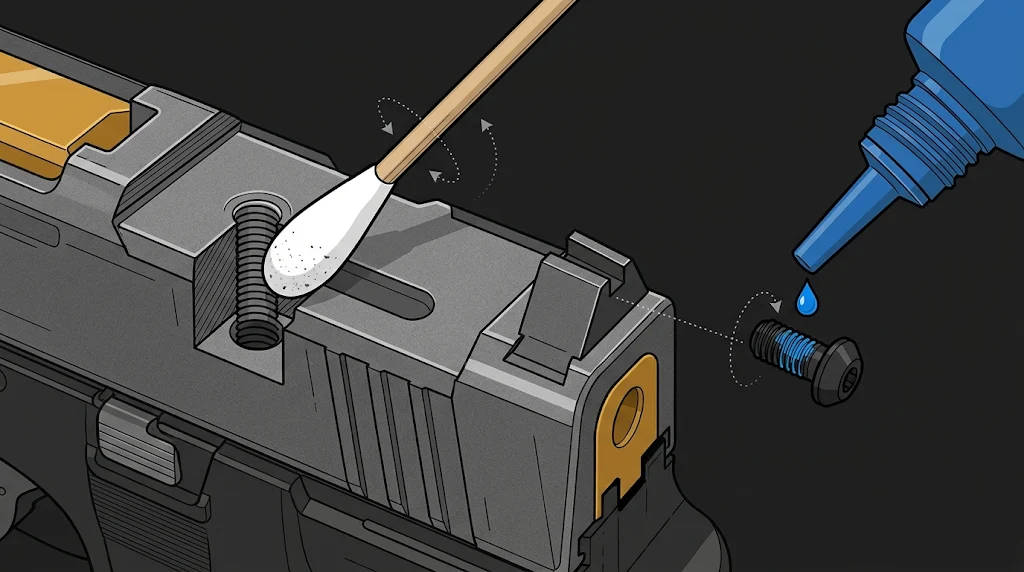
Spray a small amount of Birchwood Casey Gun Scrubber or 91%+ isopropyl alcohol onto a lint-free cotton swab and thoroughly scrub both threaded holes in the slide, the optic mounting pocket, and the threads of your mounting screws. Twist a dry swab into the blind screw holes to soak up any dissolved oil and let everything air-dry completely for 5 minutes.
Step 4: Install the Correct VIS Pin Set in the Proper Orientation
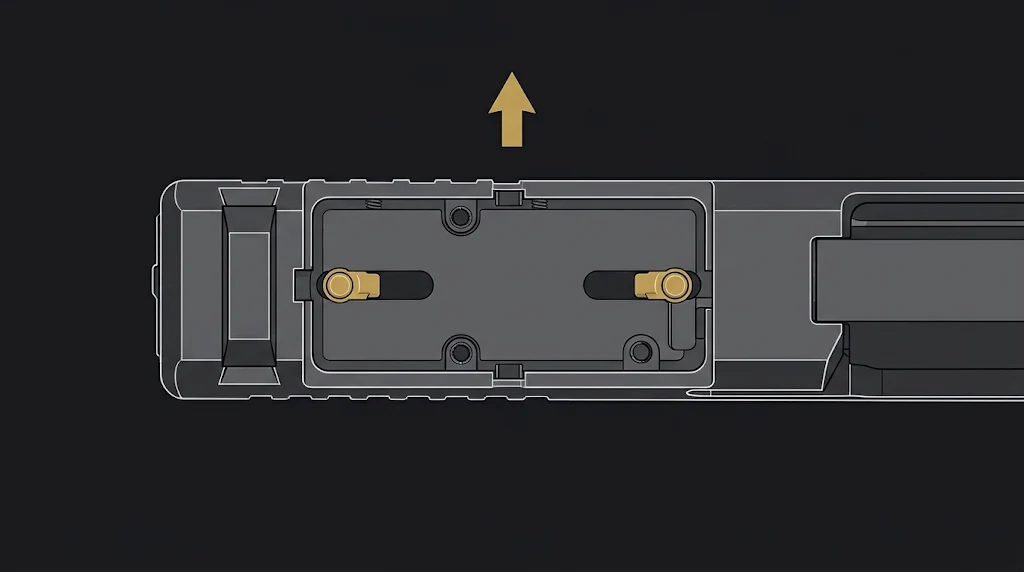
With the muzzle pointed away from you, install the pin set matching your optic's footprint into the slide pockets:
- Trijicon RMR / Holosun 507C & 508T (Pin Set 1): Place the two black delta-shaped pins into the front pockets with "L" on the left side and "R" on the right side.
- Leupold DeltaPoint Pro (Pin Set 2): Place the front delta pins in the front slots ("L" left, "R" right) and insert the two silver round pins into the rear holes with the smaller diameter facing downward.
- Shield RMSc / Holosun EPS & 507K (Pin Set 3): Place the four black micro pins in their designated front ("L" left, "R" right) and rear pockets.
Press each pin down firmly with a non-marring punch or plastic driver handle until it sits completely flush in its recess.
Step 5: Dry-Fit the Optic and Check for Flush Contact
Set your optic down over the seated VIS pins without screws or threadlocker. Look at the seam between the bottom of the optic and the top of the slide against a light source. The optic should sit completely flat with zero daylight gap underneath and minimal-to-zero side-to-side play. If one corner rocks up, re-check that the rear pins are fully seated and oriented correctly.
Step 6: Verify Screw Thread Pitch and Max Protrusion (≤ 0.110" / 2.8mm)
Before applying threadlocker, drop your dry screws through the optic's mounting holes while holding the optic in your hand. Measure how far the screw threads stick out below the base of the optic:
- If the threads protrude 0.110 inches (2.8mm) or less, they are safe to use.
- If they protrude more than 0.110 inches (2.8mm), do not install them—swap in the correct factory-length fasteners from the Springfield Echelon Optic Mounting Screw Kit so you do not bottom out the slide threads or bind the extractor.
Step 7: Apply Loctite 243 and Torque in Alternating Passes
Apply one small drop of Loctite 243 to the bottom 3–4 threads of each clean screw (avoid flooding the hole so excess liquid doesn't seep into the extractor channel). Seat the optic onto the VIS pins, start both screws by hand to avoid cross-threading, and tighten them gradually in alternating left-right passes using your Wheeler F.A.T. Wrench set to 15 in-lbs (or the exact inch-pound spec listed in your optic's manual, never exceeding 18 in-lbs) until the driver clicks cleanly.
Step 8: Check Extractor Movement and Add Witness Marks
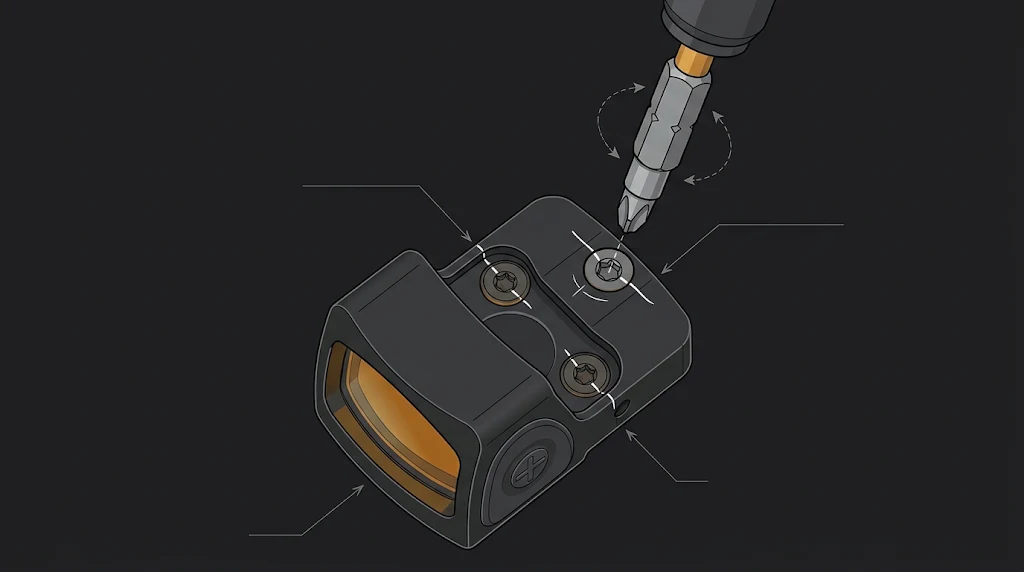
Before reassembling the slide, press gently on the extractor claw on the right side of the breech face to confirm it pivots smoothly under spring tension with zero binding from the right mounting screw. Then use a fine-tip paint pen to draw a thin witness line across each screw head onto the optic housing so you can verify at a glance at the range that neither screw has rotated.
Step 9: Let the Threadlocker Cure for 24 Hours Before Firing
Reassemble your Echelon and leave the pistol undisturbed at room temperature for a full 24 hours before live-fire testing. Once cured, run 50–100 rounds at the range and check your witness marks—both lines should remain aligned and your zero should stay locked in.
Best Practices That Keep Optics Tight
- Degrease both the blind slide holes and screw threads before every install
- Verify screw protrusion is ≤ 0.110" (2.8mm) past the optic base
- Use primerless, oil-tolerant Loctite 243 and wait a full 24 hours
- Torque evenly to 15 in-lbs with a calibrated inch-pound driver
Common Mistakes That Cause Wobble
- Using long plate-mount screws directly in the Echelon VIS slide cut
- Swapping the handed "L" and "R" delta pins or leaving rear pins out
- Applying threadlocker over factory oil or reusing stripped screws
- Shooting the pistol immediately after mounting before the bond cures